Idées de bricolage pour le jardin
+5
JoJo
Tulipe 127
Bibiane
louise lavoie
auchatelet
9 participants
Page 1 sur 3
Page 1 sur 3 • 1, 2, 3 
 Idées de bricolage pour le jardin
je vais venir mettre ici ce que je trouve qui pourrait intéresser des membres
Un trio de champignons avec des pots de terracota
( blog: http://angrypincushion.blogspot.ca/2008/10/mosaic-mushrooms.html

You Will Need:
-Two Terra Cotta Pots, One 1 1/2 inch pot (pretty tiny) and one 3 inch pot
-One 4 inch Terra Cotta saucer
-Flat glass marbles
-Polished pebbles or stones
-Two colors of Acrylic paint in shades of tan or creme
-Paint brush and sponge
-Tube of Amazing EcoGlue or Amazing GOOP Lawn & Garden
-Clear Acrylic Gloss (or Matte), Water Resistant Spray Coat
Step 1- To make the base, or the stem of the mushroom take the smaller of the two terra cotta pots (make sure it’s clean first!) and using EcoGlue or Amazing GOOP, glue it onto the larger pot (just like you were stacking them together ). Let dry for 24 hours.
Step 2- After the pots dry for 24hrs, paint the mushroom “stem” with acrylic paint. I used a tan base coat, let that dry then applied a lighter creme or tan color. Using a dry sponge I dragged the lighter shade down the sides for a layered effect, it makes it look more like a real mushroom stem. Let paint dry.
Step 3- After paint is fully dry, affix the terra cotta saucer, for the mushroom cap, to the base pots with a liberal amount of adhesive, let dry for 24hrs again.
Step 4- Now using EcoGlue or Amazing GOOP, begin applying the flat marbles and pebbles on to the top of the saucer or “mushroom cap”, and down the sides of the saucer, in whatever pattern or colors you wish. You can substitute more flat marbles for the pebbles if you wish. When you begin affixing the marbles and pebbles to the sides of the saucer, they might slide a little, so sometimes you have to hold each marble or pebble in place for a few seconds until it sticks by itself. Let dry for 24 hrs again.
Step 5- Using grout on the mushroom’s cap is optional, I chose not to, but if you like that look go for it! If you plan on putting your mushroom outside make sure to spray it using a water resistant clear gloss, or matte spray coat.
Congratulations! You are now the proud parent of a beautiful baby garden mushroom :)
Un trio de champignons avec des pots de terracota
( blog: http://angrypincushion.blogspot.ca/2008/10/mosaic-mushrooms.html

You Will Need:
-Two Terra Cotta Pots, One 1 1/2 inch pot (pretty tiny) and one 3 inch pot
-One 4 inch Terra Cotta saucer
-Flat glass marbles
-Polished pebbles or stones
-Two colors of Acrylic paint in shades of tan or creme
-Paint brush and sponge
-Tube of Amazing EcoGlue or Amazing GOOP Lawn & Garden
-Clear Acrylic Gloss (or Matte), Water Resistant Spray Coat
Step 1- To make the base, or the stem of the mushroom take the smaller of the two terra cotta pots (make sure it’s clean first!) and using EcoGlue or Amazing GOOP, glue it onto the larger pot (just like you were stacking them together ). Let dry for 24 hours.
Step 2- After the pots dry for 24hrs, paint the mushroom “stem” with acrylic paint. I used a tan base coat, let that dry then applied a lighter creme or tan color. Using a dry sponge I dragged the lighter shade down the sides for a layered effect, it makes it look more like a real mushroom stem. Let paint dry.
Step 3- After paint is fully dry, affix the terra cotta saucer, for the mushroom cap, to the base pots with a liberal amount of adhesive, let dry for 24hrs again.
Step 4- Now using EcoGlue or Amazing GOOP, begin applying the flat marbles and pebbles on to the top of the saucer or “mushroom cap”, and down the sides of the saucer, in whatever pattern or colors you wish. You can substitute more flat marbles for the pebbles if you wish. When you begin affixing the marbles and pebbles to the sides of the saucer, they might slide a little, so sometimes you have to hold each marble or pebble in place for a few seconds until it sticks by itself. Let dry for 24 hrs again.
Step 5- Using grout on the mushroom’s cap is optional, I chose not to, but if you like that look go for it! If you plan on putting your mushroom outside make sure to spray it using a water resistant clear gloss, or matte spray coat.
Congratulations! You are now the proud parent of a beautiful baby garden mushroom :)
 Re: Idées de bricolage pour le jardin
Pour faire prendre de lamousse sur des pots:
Je me demande si ce genre de pots et des choux décoratifs comme j'ai appris a connaitre sur forum ?

http://www.weekendgardener.net/container-gardening/antique-claypots-110711.htm
Adding Moss Works Best On
Terra Cotta
Stone or Concrete Containers
Stone or Concrete Sculptures
There are 2 ways to go about doing this. Both ways work really well, so choose one that best suits your tastes.
Moss requires an acidic environment to grow, which can be developed by painting a pot with buttermilk or yogurt, that's why both recipes below have one or the other.
Recipe 1:
1. Collect mosses either from around your yard or a friends or neighbors (you can also buy moss spores at a garden store)
2. Finely chop the moss up (or sprinkle in the moss spores into the mix below if you purchased them)
3. Allow the moss bits to dry up for a couple of days (if you collected them yourself)
Then mix together in a large bucket or bowl:
•1 cup flour
•2 cups buttermilk
•2 packages active dry yeast
•2 tablespoons corn syrup
•1-1 1/2 cups dried, crumbled moss
Once the above is mixed together, put the bucket in full sun for three days.
When the mixture is good and smelly, brush it generously with a paintbrush on the outsides of your clay pots. Then wrap the pots in plastic wrap and put them in partial sun.
In two weeks the pots will start to grow mold, and by eight weeks the pots will be nice and furry with moss, and looking very antique and old.
Recipe 2:
•Blend pieces of dried moss or purchased moss spores into
•2 cups yogurt or buttermilk
•Paint onto your pot with a paintbrush
•Put your pot into a plastic bag to create a humid environment for the moss to develop
•Set the pot and bag in a cool, shady spot until the moss begins to form, which will be about 10 days
•Make sure to plant the container so you will be watering it regularly, which will keep the moss alive and growing
Je me demande si ce genre de pots et des choux décoratifs comme j'ai appris a connaitre sur forum ?

http://www.weekendgardener.net/container-gardening/antique-claypots-110711.htm
Adding Moss Works Best On
Terra Cotta
Stone or Concrete Containers
Stone or Concrete Sculptures
There are 2 ways to go about doing this. Both ways work really well, so choose one that best suits your tastes.
Moss requires an acidic environment to grow, which can be developed by painting a pot with buttermilk or yogurt, that's why both recipes below have one or the other.
Recipe 1:
1. Collect mosses either from around your yard or a friends or neighbors (you can also buy moss spores at a garden store)
2. Finely chop the moss up (or sprinkle in the moss spores into the mix below if you purchased them)
3. Allow the moss bits to dry up for a couple of days (if you collected them yourself)
Then mix together in a large bucket or bowl:
•1 cup flour
•2 cups buttermilk
•2 packages active dry yeast
•2 tablespoons corn syrup
•1-1 1/2 cups dried, crumbled moss
Once the above is mixed together, put the bucket in full sun for three days.
When the mixture is good and smelly, brush it generously with a paintbrush on the outsides of your clay pots. Then wrap the pots in plastic wrap and put them in partial sun.
In two weeks the pots will start to grow mold, and by eight weeks the pots will be nice and furry with moss, and looking very antique and old.
Recipe 2:
•Blend pieces of dried moss or purchased moss spores into
•2 cups yogurt or buttermilk
•Paint onto your pot with a paintbrush
•Put your pot into a plastic bag to create a humid environment for the moss to develop
•Set the pot and bag in a cool, shady spot until the moss begins to form, which will be about 10 days
•Make sure to plant the container so you will be watering it regularly, which will keep the moss alive and growing
 Re: Idées de bricolage pour le jardin
J,aime beaucoup ce trio 
http://www.thegardenglove.com/diy-concrete-garden-globes/


http://www.thegardenglove.com/diy-concrete-garden-globes/

 Re: Idées de bricolage pour le jardin
ce sont de belles idées merci Auchatelet!

louise lavoie- Collaborateur d'Argent
- Nombre de messages : 3944
Ville et zone : lac-st jean
Date d'inscription : 30/01/2011
 Re: Idées de bricolage pour le jardin
bien jolie merci
Bibiane- Nouveau collaborateur
- Nombre de messages : 13
Ville et zone : Napierville
Date d'inscription : 24/06/2011
 Re: Idées de bricolage pour le jardin
http://www.midwestliving.com/garden/ideas/garden-art-anyone-can-create/?page=15


 Re: Idées de bricolage pour le jardin
Intéressant je trouve!
http://www.midwestliving.com/garden/ideas/create-mosaic-magic-in-your-garden/page/12/0

http://www.midwestliving.com/garden/ideas/create-mosaic-magic-in-your-garden/page/12/0
Eight, 10- and 18-inch-diameter PVC pipes cut to varying heights serve as the bases for these mosaic pillars. Overturned terra-cotta saucers turn two of the pipes into pedestals; the third cradles a flowerpot.

 Re: Idées de bricolage pour le jardin
Ce qui est intéressant est de pouvoir changer la couleur de la bouteille en verre ,,,,, sur la page il y a le lien pour savoir comment faire ce bricolage
http://rebeccasbirdgardensblog.blogspot.ca/2014/01/a-bottle-of-red.html

http://rebeccasbirdgardensblog.blogspot.ca/2014/01/a-bottle-of-red.html

 Re: Idées de bricolage pour le jardin
une idée a faire avec une palette ..... ou a faire germer plein d'autres idées 
http://www.1001pallets.com/2013/01/pallet-fence/
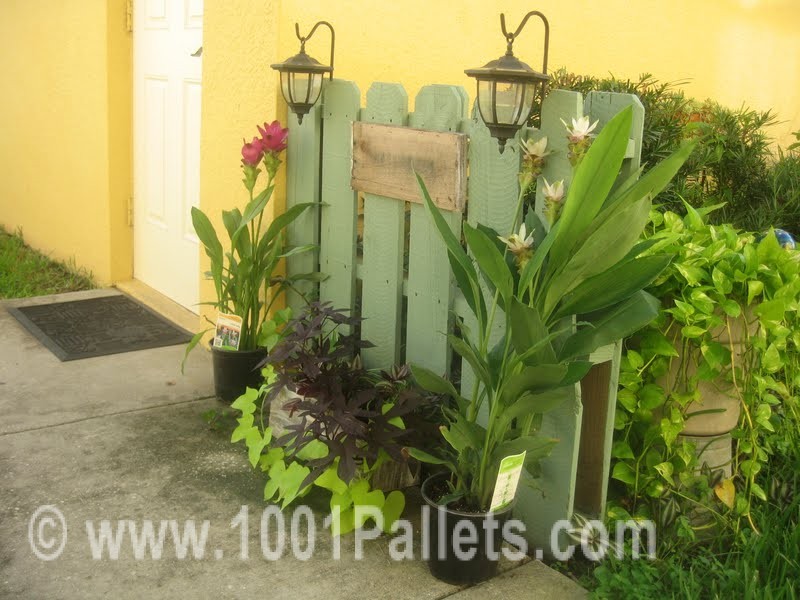

http://www.1001pallets.com/2013/01/pallet-fence/

 Re: Idées de bricolage pour le jardin
J' aime beaucoup l' idée pour la palette 


LuneSoleil- Collaborateur de Bronze
- Nombre de messages : 659
Ville et zone : Laurentides, zone 3b
Date d'inscription : 02/08/2012
 Re: Idées de bricolage pour le jardin
ça a l'air simple ,mais il fallait y penser ,merci pour toutes ces idées,bonne soirée a tout le forum
lucie2- Nouveau collaborateur
- Nombre de messages : 35
Date d'inscription : 07/02/2014
 Re: Idées de bricolage pour le jardin
http://lovegrowswild.com/2013/07/diy-garden-hose-holder/
ca commence par ca:
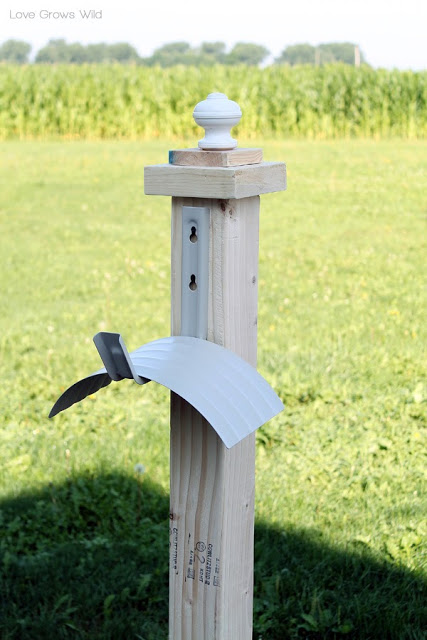
et le résultat final est :

ca commence par ca:

et le résultat final est :

 Re: Idées de bricolage pour le jardin
ici il parait que ca reposse les limaces et que ca aide les hydrangés a devenir bleu (Dépêchons nous a les ramasser avec que celles-ci soient toutes retirés de la circulation! )

( http://bethevansramos.wordpress.com/2011/01/19/penny-bowling-ball/)

( http://bethevansramos.wordpress.com/2011/01/19/penny-bowling-ball/)
 Re: Idées de bricolage pour le jardin
http://www.thegardenglove.com/more-easy-garden-projects-with-stones/


 Re: Idées de bricolage pour le jardin
http://www.garden-collection.com/image_display.asp?sku=DHD-CH275-106


 Re: Idées de bricolage pour le jardin
dans la meme lignée que la photo avec le meme bain galvanisé et les tournesols ..... avec des graminés
et en plus j'ai rencontré une personne qui a des centaines de graminés et autres plantes en pot tout l'été et qui les couchent pour l'hiver .... voici la photo :
http://www.drivenbydecor.com/2012/04/galvanized-metal-tubs-buckets-pails-as.html
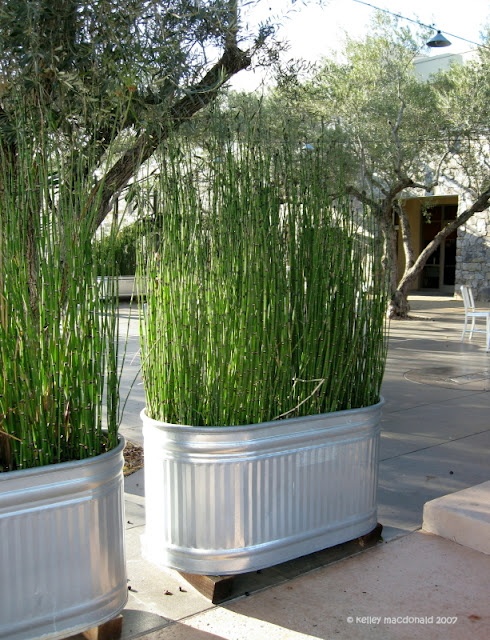
et en plus j'ai rencontré une personne qui a des centaines de graminés et autres plantes en pot tout l'été et qui les couchent pour l'hiver .... voici la photo :
http://www.drivenbydecor.com/2012/04/galvanized-metal-tubs-buckets-pails-as.html

 Re: Idées de bricolage pour le jardin
Principe déjà vue mais tellement cute cette photo la!
http://www.diycolorburst.com/pretty-diy-outdoor-planters-ideas-for-summer/

http://www.diycolorburst.com/pretty-diy-outdoor-planters-ideas-for-summer/

 Re: Idées de bricolage pour le jardin
Ca m'a fait penser a la plante que j,ai découvert sur mon terrain et que j,adore ..... vous m"avez donné le nom que j,ai oublié mais je n'oublie pas la plante car je l"adore! je me souviens que Tulipe s'en sert comme deco dans une chose qui est sur un mur de la maison
http://www.zone10.com/small-yard-landscape-design.html

 Re: Idées de bricolage pour le jardin
Ca me fait penser qu'il faudrait que je trouve des graines pour me partir des choux décoratifs comme ..... je n'ose pas mettre le nom de peur de me tromper mais j'ai encore en image ses superbes photos de choix décoratifs!
est-ce qu'on trouve ca partout des graines de choux décoratifs?

est-ce qu'on trouve ca partout des graines de choux décoratifs?

Page 1 sur 3 • 1, 2, 3 
 Sujets similaires
» idées pour le jardin
» idées de bricolage
» Recettes et idées de Botanus pour nourrir les oiseaux et une tite maison pour les abeilles
» Idées de jardin - Bertrand Dumont
» Jardin de L'autre monde - Idées de Structures Extérieures
» idées de bricolage
» Recettes et idées de Botanus pour nourrir les oiseaux et une tite maison pour les abeilles
» Idées de jardin - Bertrand Dumont
» Jardin de L'autre monde - Idées de Structures Extérieures
Page 1 sur 3
Permission de ce forum:
Vous ne pouvez pas répondre aux sujets dans ce forum
 Dernières images
